This was the first Christmas in my life to not be with my parents in Alabama on Christmas Day. I have always dreaded this day, but it was a pleasant day for me.
We did celebrate Christmas with my parents. Two years ago, with a new baby, one of the grandkids suggested we get together before Christmas. Several have to fly. The flights would be cheaper and the airport less crowded. So it worked out very well.
This year another grandkid took up the banner and got everyone to come together for the weekend of the 14th.
I had planned to fly in from Florida on the 11th. But, mom ended up in the hospital again and dad needed me. So I drove up on the 4th. Medical things were taken care of.
The grandkids and great grandbaby began arriving and our typical family Christmas happened, just 11 days early. Mom still wasn't well, but enjoyed the distraction of company.
Then after the weekend, several were still around the family compound. Two trips to Urgent Care for ear infection for one and sinus infection for another was followed by 5 cases of stomach virus - one of those cases being me! I was managing well being the family hostess in my mom's place, taking care of her and helping my dad, doing overnight baby duty so parents could sleep all night next door, until the virus. 22 hours in the bed still left me with a tender stomach.
Since my husband's contract stated specifically that he had to be in Florida for Christmas Eve, I had decided several weeks ago that I would come back to Florida as he missed all the family hoopla. That became iffy as my mom made slow progress. We were able to hire some very caring people to help mom and dad. I left for the 12 hour drive on Monday. Traffic was busy and serious rain hit me after I crossed the Florida state line. I was physically and emotionally exhausted when I returned.
My husband and I had decided in advance that we would not exchange gifts as there is nothing in the world we need or really desire to add to our collection we haul across the country.
For my first Christmas Day EVER not in Alabama with my parents, we rode bikes to the beach, walked on the beach, laid on towels, rode our bikes back in the rain getting soaked, then decided to go ahead and get in the pool. The sky turned clear, blue and sunny by the time we changed. After a light lunch we headed off to our "friends like family" from Illinois who now live 30 minutes south of us. I am used to lots of noise and activity on Christmas Day. But I've had that already.
My Christmas Day was perfect.
Wednesday, December 25, 2019
Thursday, February 21, 2019
Back to Denim
As I look over my Etsy shop sales, I see that my denim creations have been better sellers than custom quilts, even though the quilts are more fun for me. So after my big push to finish Sweet Dreams for Danielle, I have pulled out my bin of recycled denim jeans. In the beginning I bought jeans at thrift stores, but now I have a reputation and people bring me their pre-loved jeans.
My most favorited item in my Etsy shop is denim throw pillows which are half bleached. So weeks ago I had cut and bleached some denim, but didn't do anything with them. Over the last 2 days I have made 8 pillow covers. That is the easy part! Now I will need to find pillow inserts for each and photograph. That is the last 10% that is essential, but difficult for me.
We are having rain for the next week, and company, and a trip to Ridgecrest, North Carolina. So it might be a while before I get them photographed and listed.
In case you want to take a peek, my Etsy shop is linked here: TheDogwoodBlossom
Tuesday, February 12, 2019
Sweet Dreams Danielle
My daughter
in law, Danielle, is dear to me. My son
chose her, and she adores him. She is the mother of my first beloved
granddaughter, and she is the most kind and patient mother I have ever seen.
My fondest memories of Danielle came from
an extended stay they had with us in Holland, Michigan. I think that was the time I saw her most
relaxed and at peace with herself.
During that time, she would just sing out when her heart was happy, no
self-consciousness, just joy. I have
always been intimidated to sing out loud.
Danielle has a sweet and lovely voice.
My skills are more like the proverbial “can’t carry a tune in a
bucket.” But from her I learned to just
sing it out when I feel it. I have
stopped being embarrassed by my lack of skill, just show the joy inside.
It was thrill to me when she took up
quilting. It is fun to have that in
common. In Holland my quilting area was
in the basement. She and I had tables
set up where we could sew at the same time.
We continue to enjoy showing each other our latest creations and
discussing our plans.
From Danielle I learned to count the
actual time spent on a quilt. Before I
just knew I worked a week on that one, 3 weeks on that one, etc. But she counts the actual hours. That’s discipline. Danielle is probably the most disciplined
person I know. If I am going to make quilts
to sell, I need to know how much time I spent.
So, I have lately begun to follow her lead and log my time. That is how I know her quilt took 78 hours
not counting the times I lay awake at night thinking about it. She is worth every minute and more.
Danielle causes me to reflect on
myself. I would often see something in
her that would cause me to see myself. I
saw our similarities. It took me a long
time to see our differences and part of that came from her pointing them out to
me.
Here is the metaphor I have for the two of
us. I am a bubbling stream. I’m not deep, you can see the bottom and know
what is there. There are a few nooks and
crannies that hide little creatures, but it is mostly transparent. I’m mostly cheerful. I take things at face value. There are storms that cause me to swell and
churn, leaving some rocks moved and banks eroded, but when they are over, I’m
pretty much the same.
Danielle is a deep ocean. Our life experiences have been very
different. I have the luxury of being shallow and transparent. She does not have that luxury. She has many layers that have different
temperature zones, light zones and different creatures abiding in each. On sunny days she is a beautiful azure. Then there are gray stormy days when she is
clouded over, waves are tossed, and things from the deep surface.
If you met Danielle, you would know right
away she is beautiful. It would not take
long before you would perceive that she is extremely intelligent. But as I have known her for 10 years, the word
that comes to my mind to describe her is overcomer. She has grown and developed in so many ways
over the past 10 years. She has looked
into the depth of her soul in ways few people are brave enough to do and
allowed herself to be transformed.
Monsters from the deep threaten to pull her under, but she fights for
the light. She fights to overcome; to
overcome evil with good; overcome hate with love; overcome cruelty with
kindness and gentleness; overcome chaos with shalom.
She has been willing to share with me some
of these battles so that I can understand her more intimately. It only causes me to love her more deeply.
So as I spent the hours on a quilt to wrap
her in love, acceptance and shalom, I have prayed for her. Another experience we have had together was
being able to attend Ray Vander Laan Bible classes. From those we heard about the world being
plunged into chaos and God’s spirit moving to bring shalom. The call of Christians is to bring shalom to
a chaotic world. So, I have prayed
continually for God’s shalom for her.
The Hebrew expresses much more than peace as in absence of war. It expresses peace, wholeness, wellness,
prosperity in mind, soul and body.
So, Danielle, here on your birthday I want
you to know I am constantly amazed at what I have seen God do in your
life. Constantly amazed at the changes
you have allowed and incorporated.
Constantly amazed at your discipline.
Constantly amazed at your transformation. And constantly amazed that it continues day
after day after day.
Shalom my dear daughter of the heart.
Sunday, February 10, 2019
Sweet Dreams - Finishing Up
My favorite pieced quilt of all time! I love this quilt. The piecing is very precise thanks to Deb Tucker's V block ruler, Quilt in a Day triangle ruler and extreme starching. I love the colors and fabrics, Hand Picked by Riley Blake. I love the design. This is the most complicated piecing I have done and I am so pleased with how it turned out.
As best as I can tell, it took 59 hours to starch the fabric , cut out, and piece the top together. It took 14 hours to make the quilt sandwich and quilt it. It took 4 hours to make the binding, bind it and make the label. Speaking of the binding, I decided to use continuous bias binding as binding on the bias is supposed to wear longer. I have used other tutorials in the past on how to cut the continuous binding but the one from makeit-loveit. com explained it more clearly than I have seen it before. How to Make Continuous Strip Bias Binding .
I frequently neglect the last 5%, taking good pictures of my finished product as they are out the door as soon as they are finished. This one had a trip to Stone Mountain Park in Georgia for her photo shoot.


I frequently neglect the last 5%, taking good pictures of my finished product as they are out the door as soon as they are finished. This one had a trip to Stone Mountain Park in Georgia for her photo shoot.


Sweet Dreams - Quilting
Ahhh, quilting. You finish your quilt top and feel victory, then realize you gotta quilt this puppy! There was a 2 week trip, so the top had to be left on its own for that time. Since the beginning, I have considered how to quilt it.
Serious over the top free motion quilting seems to be all the rage right now. While it sometimes looks awesome, sometimes it seems to take away from the piecing. There is also the debate about the comparison between the cuddle factor of intensely quilted quilts versus less densely quilted. Many seem to side with a less densely quilted quilt being more cuddly. I also read recently that less densely quilted quilts are warmer because there is more space for air to be trapped.


This quilt has a lovely and soft pink Minky cuddle fabric on the back because my daughter in law LOVES Minky. She also lives where it is very cold in the winter and as she has a February birthday, this will wrap her in warmth from the very beginning. But Minky is heavy. Therefore, I did not want to do a walking foot quilting going back and forth from top to bottom or side to side over and over again. I love the fresh and clean look Rita from Red Pepper Quilts has with her quilts that mostly have straight line quilting with the walking foot. Red Pepper Quilts I want the piecing to shine, but it is hard to wrestle a quilt this size and weight by myself.
I had asked a long arm quilter what she would recommend. She took one look at the photo and said an all over pattern. My fear was that would still leave me having to move the quilt great distances in my pursuit of a continuous overall design. You see, I am still not that proficient.
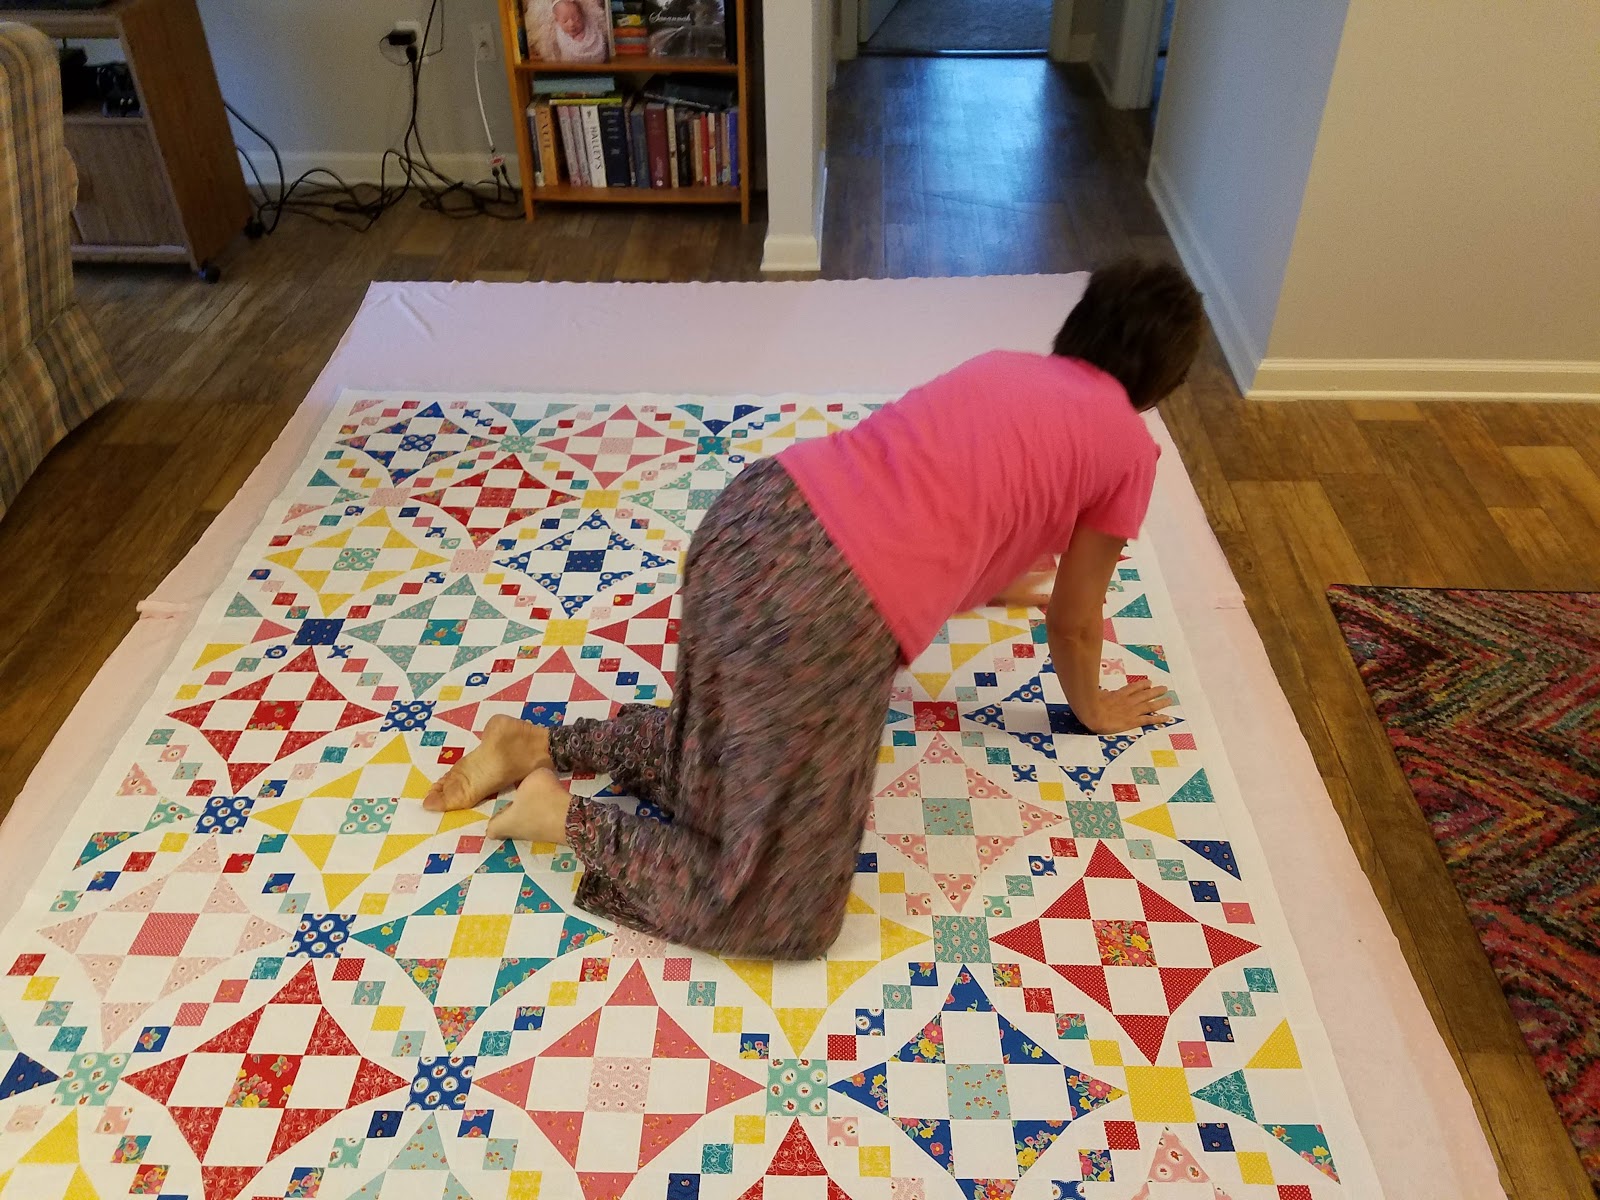
Stroke of luck, I found in my supplies 3 inch stencils. They would fit perfectly in the white squares and the print square centered in them. Then I could free motion stitching in the ditch around the 4 pointed stars. Loved that idea. I left on my trip, came back ready to get started.
First morning, out of bed, I began by laying out the batting on the floor and had my dear sweet man crawling on the floor with me to use spray adhesive to attach the top to the batting. Then I laid out the Minky. I was displeased with the feel of the finishing chemicals on it. Also it had some pretty intense wrinkles from how it was placed on the bolt. SO, change of plans. I put the Minky in the wash, sent hubby to work and he would help me finish when he came home for lunch.


I just like to "get 'er done", but since I had the delay, I thought I probably should practice my stencils. Oh boy, what a disaster! One side was fine, but when I began to sew the second half, sewing blind by going backwards, the sides were definitely not symmetrical. 3 different designs and none very good. Also I had trouble with the pink chalk markings being hard to see. So I practiced sewing straight lines free motion style. I could do that. Change of plans, straightish (as Angela Walters says) diamond shapes. I marked my diamonds with frixion gel pens. Later I threw the quilt in the dryer so the heat would remove the markings.
13 hours later I emerged from my sewing room with the quilt quilted to suit me!


Sweet Dreams - Choosing Batting
There is time spent on choosing a pattern for a quilt, planning it, selecting the fabric and color scheme etc., but I fail to count the time spent in the middle of the night worrying about a quilt plan.
The middle of the night wake up call happened several times with this quilt. The quilt could only have Minky (Cuddle) backing because my DIL LOVES it! I have 2 problems with Minky on a full sized quilt. One- it is heavy when moving the quilt around to quilt it. Two - it does not shrink but the quilt batting and top do shrink. I have seen quilts where the MInky doesn't lay smooth after the quilt was washed. So in the past to avoid that I have put a muslim backing on a quilt, quilted it, did a fast self binding, washed the quilt then added the Minky with just a few lines going across to hold it in place, then adding another binding. To quilt, then add Minky, almost doubles that work.
I have also wanted to avoid intensely quilting the Minky because the point is its softness. I talked with a long arm quilter who said she quilts quilts all the time with Minky and it does not affect its cuddliness. Hummm, new thought.
On one of my middle of the night wake up and think about the quilt times, I suddenly had an epiphany - use polyester batting! The batting always shrinks more than the top giving the quilt the crinkly look. But if I use polyester batting, it will not shrink just as the Minky does not shrink!
Problem solved - I think!
Tuesday, January 29, 2019
Sweet Dreams - Planned Scrappy
Scrappy - easy isn't it? Not if you have planned scrappy, at least not for me. Lissa Alexander has only 2 colors in her pattern, so she is able to make it faster because she can make a larger 15 inch block. Easy peasy. The other patterns I looked at were total scrappy, and relatively easy once you realize it is only 2 different blocks put together - a churn dash and 54 or fight. BUT I wanted the 4 pointed "stars" to really stand out, emphasizing the circular look. Therefore, they were each to be the same color family. This means that I could make the churn dash blocks using the same color family but not the 54 or fight block. They would each need to be laid out with each church dash and the 4 sides selected.

 Do the pictures help it make more sense? It was laid out one row at a time. You can see the churn dash blocks, but I had to plan the colors carefully. But aren't the colors lovely, cheerful and happy? I love them!


 It took 3 days of crawling around on the floor, but in the end, I was very happy with how it turned out.
Now to borders. Very much I wanted the 4 point "stars" to be the focus and not be cut up. So a white border was added to give the eye a place to stop.

 Now, to add another border or not? The quilt is plenty big - maybe bigger than I intended. After checking images of modern quilts and seeing they do not usually have borders, I am going with the more modern look of no border. But I will have a binding in a torquoise color.
NOW the terrible part! HOW TO QUILT THIS BABY!


Now to borders. Very much I wanted the 4 point "stars" to be the focus and not be cut up. So a white border was added to give the eye a place to stop.


NOW the terrible part! HOW TO QUILT THIS BABY!
Wednesday, January 23, 2019
Good Quilt Husband
I have always called my husband a "good quilt husband". He will crawl around on the floor to help me spray baste a quilt sandwich together. He will walk through the quilt fabric store with me and give me his opinion. He never complains about my spending money on quilting supplies. Will carry my machine and supplies to the car when I go to a quilt class or QOV sew day. I will call him to come look at what I have laid out and ask his opinion. I always preempt it by saying, "I want your opinion, but I might or might not use it." And he takes that well. There have been times when he has absolutely changed what I was going to do for the better. He even saved me from a huge design mistake on the bear quilt! He instinctively knew my proportions were off. His suggestions totally made it!
When I planned a quilt for my daughter in law's birthday, I figured I would have 3 or 4 weeks to get it done. BUT then my best friend from Illinois decided our annual girls' trip to Arizona should happen in January rather than February after the DIL birthday. That threw a wrench into my quilting plans. So the past 8 days have seen me put 59 hours into this quilt.
While working on it, my husband has not complained about leftovers, he has been gracious to go to the grocery store and pick up emergency supplies (like half and half for MY coffee), quietly left his laundry hamper in the way so I would see he needs clean clothes. AND I noticed the kitchen would have a little fairy that would clean it up.
He no longer deserves the title of "Good Quilt Husband", but the title of "Great Quilt Husband."

Sunday, January 20, 2019
Sweet Dreams - Half Square Triangles

There are so many ways to make half square triangles.
There is the "magic 8" to make 8 at a time;
stitching the outside edges of a square, cutting an x to make 4 at a time;
making 2 at a time from 2 squares laid together;
and my favorite way, with strips. Sew 2 strips together with a 1/4 inch on both sides, then cut with Quilt in a Day triangle square up ruler placed on the SEAM line, not the edge. Then NO SQUARING up is necessary! Woo hoo!
Since I was using 10" square, the strip method was not going to work for me. I would have to make them 2 at a time in order to utilize my fabric in the most efficient way. Ugh! Such a time consuming method when you have 148 to make!
I cut 4 inch squares - why would directions for a 3.5 inch block (3 inch finished) say to cut 3 and 7/8 inch squares? Really? I prefer to cut slightly larger (only 1/8 of an inch) and have room for mistakes that can be trimmed out. Using Fons and Porters's 1/4 ruler, I drew a line on either side with a Frixion gel pen. Then placed white and print squares together, sewed down each line and cut apart.


 |
| Since I wanted a 3.5 inch HST, the 3.5 line goes on the stitch line, not the edge. It comes out perfect! |
Once again the heavily starched fabric was easy to finger press saving time at the ironing board and my blocks did not stretch out of shape while being manipulated.

Then time for the 4 patch blocks - 160 of those! This is the first time I have made a quilt that will have some pieces that are only 1.5 inches square!
 |
| Stitched and ready to open up. |
 |
| 160 4 patch blocks ready to go. |
Sweet Dreams - V Blocks

With 148 V blocks to make, I needed to be able to pick up my pace. I only got 40 made on the first day. The pattern has templates to use to make the blocks. Most patterns do. That spells wonky disaster in my book. I was grateful that in the last quilting class I took, we were provided with our fee Deb Tucker's V Block ruler. I cannot imagine making 148 blocks without it!
The directions are simple. The ruler provides lines to cut the middle triangle and the sides. For a 3.5 inch block (3 inch) finished, you cut a strip 4" wide. That gives plenty of room for trimming up without wasting fabric. And it makes a PERFECT block.

Since I had starched the fabric with straight starch, it was easy to finger press after the first side was stitched without having to go to the ironing board. Then I added the second side, finger pressed and ended with a touch up from the iron.
After stitching the sides, the lines on the ruler are easy to see. First cut comes from this side.

Flip the block over and easy to use lines are on the other side.
Result - perfect block.
Perfectly squared.
Perfect 1/4 seam at the top.
 |
| Aren't these luscious looking? Stacked in groups of 4. |
Saturday, January 19, 2019
Sweet Dreams, End of Day One
This quilt needs 60 degree blocks, half square triangle blocks, 3.5 inch squares and 4 patch. Since each block will be 3 inches finished, I need 3.5 inch blocks.
So from the 10 inch squares, I cut 2 - 4 inch strips and 1 - 2 inch strip. I get bored easily, so decided to make 3 kinds of blocks from each layer cake.
 By the end of the day, this is all I have. I think I will have to change my strategy tomorrow. I will need 148 half square triangles, 148 60 degree blocks, and even more 4 patches.
So from the 10 inch squares, I cut 2 - 4 inch strips and 1 - 2 inch strip. I get bored easily, so decided to make 3 kinds of blocks from each layer cake.

Friday, January 18, 2019
Sweet Dreams
"No one has ever made a quilt for me." We were discussing a quilt I had made for my son in law when my daughter in law said that. My daughter in law is dear to me. I have made a quilt for my son ( a Quilt of Valor as he is a combat infantry marine veteran) and my grandbaby (her daughter) and even my daughter in law's mother (a What Cancer Cannot Do panel quilt during her radiation treatments). I was a little surprised since she is a quilter herself. I have learned from experience, you don't make Italian food for real Italians. So I was not sure a quilter would want a quilt made by someone else. But I was glad to know it. Of course, it is time for me to make one for her. With her birthday coming up in February, this is the perfect time.
Since my daughter in law is a quilter, I knew her quilt had to be extra special. I have been doing a lot of applique lately. But for my DIL, I decided on a challenging and complicated pieced project. First step, always make a pinterest board - in this case, private of course, so she would have no hints that a quilt was coming. I have loved Shakespeare in the Park for a long time. It is on my bucket list. I also love Storm at Sea. I remembered some other patterns that look like curved piecing, but it is actually an optical illusion - looked curved (which I am scared of) but is not. I looked at patterns called Calypso, kaleidoscope and others. I found 3 patterns that are very similar I was drawn to for this project - one called Emily's wedding quilt, another called Aunt Gracie's Garden Quilt, and finally Missouri Star Quilt Company has a tutorial on it. It is actually 2 blocks put together that look totally different when placed together. I did not like the edges having incomplete blocks, so I found a pattern just like I wanted called Sweet Dreams in a book of red and white quilt patterns by Martingale Press. Sweet Dreams, perfect name for my daughter in law's new quilt!
Emily's Wedding Quilt
Aunt Gracie's Garden Quilt
Missouri Star Quilt Company Version
Sweet Dreams by Lissa Alexander

So pattern decided upon! Then on to fabric choice.
Several weeks ago, knowing it could come in handy in the future, I had sent a link to Shannon Brinkley's color style quiz to my daughter and DIL. I wanted to see what color schemes they are most drawn to. How helpful is that to know! You can take the quiz here: Shannon Brinkley's Color Style Quiz
Both girls came up as "spring" while I fell evenly between spring and winter which are basically the same, just winter is more intense. White, not cream. Clear colors, not muted. Then I saw that Missouri Star Quilt Company's Daily Deal was a layer cake (10 inch squares) that were spring colors and perfect for DIL's quilt! It was from Riley Blake Designs, called Hand Picked by Tammie Green. Two layer cakes would be needed for this project.

I spent the weekend starching and ironing fabric. Intricate piecing is always easier to manage and more precise with highly starched fabrics. I use straight liquid starch, not to be confused with spray starch. I do pour it into a bottle and spray it on. When dry, the fabric becomes stiff like card stock.
Ready to begin!
Thursday, January 17, 2019
Baby Arizona

I was recently commissioned to make a baby quilt for a special baby whose name is going to be Arizona. Her parents lived in Casa Grande, Arizona and had recently moved to Wisconsin.
It seems the hardest part for me is deciding on a design. Cacti are big right now, but are they right for a baby quilt? I was told to make it whimsical. I spent a lot of time looking at fabrics. I texted pictures of feminine looking cacti fabrics to the customer for her opinion. We selected a backing fabric that was light pink with cacti in aquas and pinks and grays.

Who wants to lay their baby on top of cacti? I remembered being in the Arizona desert and early one morning seeing a hot air balloon flying over the cacti. This might be an idea I can go with. So here is my original sketch that I shared with my customer. She liked it.
 |
| My original sketch of an idea. |
Now to make it a reality. I went to another fabric store with my backing fabric. The backing fabric actually caused a problem for me. The greens were more of an blue green. Most regular greens I looked at for the cacti clashed with the colors in the backing fabric. I eventually decided on a triangular print that I thought blended well and would give texture to the cacti. Then mountain fabrics and sky fabrics were selected. Desert browns and tans did not go with the backing fabric either. Since gray is the new neutral, I found grays that would work well as desert floor and mountain - I look for fabrics that will give a shadow and texture effect.
Remembering the "rule of thirds" I began to lay out the proportions for the quilt.

I stitched the floor of the desert to the sky as a beginning point. I wanted to match the shape of Picacho Peak for the mountain. I had visited this area and knew the parents to be had climbed this peak several times. If I did it just right, they should recognize it.

I tried freehanding it and could not make it look just right. Finally, I downloaded the picture to a word document, kept zooming in until the peak section filled the page and printed it. Then I could trace it onto the fabric.

The response from the customer when she finally saw the quilt was, "You nailed Picacho Peak." Just the response I hoped for!
I used Misty Fuse for the applique. Shannon Brinkley is the one who turned me on to Misty Fuse. It leaves the fabric with a natural, not stiffer feel. I keep all my scraps with Misty Fused backing in a separate container to use on other applique projects. I also learned from Shannon to use a stabilizer behind the applique when I zigzag the raw edges. It prevents "tunneling" which if you have ever seen it will know exactly what I mean. I used a tear away stabilizer behind the edges.
On to the foreground. Using some of the backing fabric, I ironed a lightweight interfacing and cut out some of the cacti. I then raw edge stitched them to the foreground. Googling suguaro silouettes I printed outlines changing the sizes. Using a technique I learned from Bee in My Bonnet's Lori Holt, I stitched around the outline of the suguaro to the same lightweight interfacing bumpy side to right side. Then I cut a slash in the interfacing, turned it, evened out the edges and pressed it onto the foreground. I used an applique stitch to attach that gives a hand turned look.

I decided on 3 balloons in different sizes to give them a look of differing distances. Each would have one of the baby's names, first, middle and last. I cut out wrapping paper in order to try out the sizes and placement I wanted.
 |
| Wrapping paper to decided on sizes and placement of the hot air balloons. |
Now to the fun part. Decorating the balloons. Going through my bin of Misty Fused fabrics I selected fun and bright colors to make each balloon special. While I had problems choosing fabrics to blend with my backing fabric for the desert, cacti and mountains, I had no compulsions about making the balloons coordinate as balloons flying over the desert are multicolored and beautiful. To add more whimsy, color and fun, I added pennant banners flying from each balloon.
When it came time to quilt the quilt, I added desert animal outlines in quilting which represent camouflaged animals. There are snakes, lizards, foxes, horses, tortoises and other animals. The sky was quilted with whimsical curls to add to the fun.
The binding was a fun black and white polka dot.
The customer was quite pleased with how it turned and the new parents were excited and happy with the quilt honoring their new baby.
 |
| Baby Arizona enjoying her quilt. |
Saturday, January 5, 2019
2019 Reading Challenge
Welcome 2019!
The beginning of a new year is always a great time to take stock of your life and what is going on, what you want to accomplish, how you want to change. I don't necessarily do resolutions, but I will set goals.
One goal I like to keep track of is reading. I always have a book I am reading, but often fail to keep the list of what I have read.
This year I am challenging my family to use Tim Challies Reading Challenge.
I like Tim's list because it keeps me from reading the same type of books over and over again. His is a list for Christians, but there are plenty of categories that do not fall into a Christian category.
I have finished already a book recommended by a friend, Kristin Hannah's The Great Alone.
Next I have started a book I picked up at a thrift store over a year ago, a biography by Dan Kurzman, Ben-Gurion, Prophet of Fire. I have always been interested in the history of modern Israel. This is a physical book. I normally read a digital book and love audio books while sewing or walking. I found this article interesting in promoting physical books.
So begins my year long reading goals. Of course, I also have sewing goals, fitness goals, relational goals.
What are your goals for the new year?
Subscribe to:
Posts (Atom)