Tuesday, January 29, 2019

Sweet Dreams - Planned Scrappy

     Scrappy - easy isn't it?  Not if you have planned scrappy, at least not for me.  Lissa Alexander has only 2 colors in her pattern, so she is able to make it faster because she can make a larger 15 inch block.  Easy peasy.  The other patterns I looked at were total scrappy, and relatively easy once you realize it is only 2 different blocks put together - a churn dash and 54 or fight.  BUT I wanted the 4 pointed "stars" to really stand out, emphasizing the circular look.  Therefore, they were each to be the same color family.  This means that I could make the churn dash blocks using the same color family but not the 54 or fight block.  They would each need to be laid out with each church dash and the  4 sides selected. 

       Do the pictures help it make more sense?  It was laid out one row at a time.  You can see the churn dash blocks, but I had to plan the colors carefully.  But aren't the colors lovely, cheerful and happy?  I love them!
    

     It took 3 days of crawling around on the floor, but in the end, I was very happy with how it turned out.
     Now to borders.  Very much I wanted the 4 point "stars" to be the focus and not be cut up.  So a white border was added to give the eye a place to stop.

     Now, to add another border or not?  The quilt is plenty big - maybe bigger than I intended.  After checking images of modern quilts and seeing they do not usually have borders, I am going with the more modern look of no border.  But I will have a binding in a torquoise color.
     NOW the terrible part!  HOW TO QUILT THIS BABY!

Wednesday, January 23, 2019

Good Quilt Husband

     I have always called my husband a "good quilt husband".  He will crawl around on the floor to help me spray baste a quilt sandwich together.  He will walk through the quilt fabric store with me and give me his opinion.  He never complains about my spending money on quilting supplies.  Will carry my machine and supplies to the car when I go to a quilt class or QOV sew day.  I will call him to come look at what I have laid out and ask his opinion.  I always preempt it by saying, "I want your opinion, but I might or might not use it."  And he takes that well.  There have been times when he has absolutely changed what I was going to do for the better.  He even saved me from a huge design mistake on the bear quilt!  He instinctively knew my proportions were off.  His suggestions totally made it!
     When I planned a quilt for my daughter in law's birthday, I figured I would have 3 or 4 weeks to get it done.  BUT then my best friend from Illinois decided our annual girls' trip to Arizona should happen in January rather than February after the DIL birthday.  That threw a wrench into my quilting plans.  So the past 8 days have seen me put 59 hours into this quilt.
     While working on it, my husband has not complained about leftovers, he has been gracious to go to the grocery store and pick up emergency supplies (like half and half for MY coffee), quietly left his laundry hamper in the way so I would see he needs clean clothes.  AND I noticed the kitchen would have a little fairy that would clean it up.
     He no longer deserves the title of "Good Quilt Husband", but the title of "Great Quilt Husband."

Sunday, January 20, 2019

Sweet Dreams - Half Square Triangles


     There are so many ways to make half square triangles.  
There is the "magic 8" to make 8 at a time; 
stitching the outside edges of a square, cutting an x to make 4 at a time;
making 2 at a time from 2 squares laid together;
and my favorite way, with strips.  Sew 2 strips together with a 1/4 inch on both sides, then cut with Quilt in a Day triangle square up ruler placed on the SEAM line, not the edge.  Then NO SQUARING up is necessary!  Woo hoo!

     Since I was using 10" square, the strip method was not going to work for me.  I would have to make them 2 at a time in order to utilize my fabric in the most efficient way.  Ugh!  Such a time consuming method when you have 148 to make!

     I cut 4 inch squares - why would directions for a 3.5 inch block (3 inch finished) say to cut 3 and 7/8 inch squares?  Really?  I prefer to cut slightly larger  (only 1/8 of an inch) and have room for mistakes that can be trimmed out.  Using Fons and Porters's 1/4 ruler, I drew a line on either side with a Frixion gel pen.  Then placed white and print squares together, sewed down each line and cut apart.

     
      After sewing them all together and cutting apart, I used the Quilt in a Day Triangle Square Up ruler to trim BEFORE opening the blocks without having to flip and trim each one twice.  
     

Since I wanted a 3.5 inch HST, the 3.5 line goes on
the stitch line, not the edge.  It comes out perfect!

     Once again the heavily starched fabric was easy to finger press saving time at the ironing board and my blocks did not stretch out of shape while being manipulated.
    The blocks end up with "ears" on each side which you just trim off.

     Then time for the 4 patch blocks - 160 of those!  This is the first time I have made a quilt that will have some pieces that are only 1.5 inches square!
Stitched and ready to open up.

160 4 patch blocks ready to go.


Sweet Dreams - V Blocks


     With 148 V blocks to make, I needed to be able to pick up my pace.  I only got 40 made on the first day.  The pattern has templates to use to make the blocks.  Most patterns do.  That spells wonky disaster in my book.  I was grateful that in the last quilting class I took, we were provided with our fee Deb Tucker's V Block ruler.   I cannot imagine making 148 blocks without it!
     The directions are simple.  The ruler provides lines to cut the middle triangle and the sides.  For a 3.5 inch block (3 inch) finished, you cut a strip 4" wide.  That gives plenty of room for trimming up without wasting fabric.  And it makes a PERFECT block.


     Since I had starched the fabric with straight starch, it was easy to finger press after the first side was stitched without having to go to the ironing board. Then I added the second side, finger pressed and ended with a touch up from the iron.

     After stitching the sides, the lines on the ruler are easy to see.  First cut comes from this side.

Flip the block over and easy to use lines are on the other side.


Result - perfect block.
Perfectly squared.
Perfect 1/4 seam at the top.


Aren't these luscious looking?  Stacked in groups of 4.


Saturday, January 19, 2019

Sweet Dreams, End of Day One

     This quilt needs 60 degree blocks, half square triangle blocks, 3.5 inch squares and 4 patch.  Since each block will be 3 inches finished, I need 3.5 inch blocks.  
     So from the 10 inch squares, I cut 2 - 4 inch strips and 1 - 2 inch strip.  I get bored easily, so decided to make 3 kinds of blocks from each layer cake.
     By the end of the day, this is all I have.  I think I will have to change my strategy tomorrow.  I will need 148 half square triangles, 148 60 degree blocks, and even more 4 patches. 

Friday, January 18, 2019

Sweet Dreams

     "No one has ever made a quilt for me."   We were discussing a quilt I had made for my son in law when my daughter in law said that.  My daughter in law is dear to me.  I have made a quilt for my son ( a Quilt of Valor as he is a combat infantry marine veteran) and my grandbaby (her daughter) and even my daughter in law's mother (a What Cancer Cannot Do panel quilt during her radiation treatments).  I was a little surprised since she is a quilter herself.  I have learned from experience, you don't make Italian food for real Italians.  So I was not sure a quilter would want a quilt made by someone else.  But I was glad to know it.  Of course, it is time for me to make one for her.  With her birthday coming up in February, this is the perfect time.
     Since my daughter in law is a quilter, I knew her quilt had to be extra special.  I have been doing a lot of applique lately.  But for my DIL, I decided on a challenging and complicated pieced project.  First step, always  make a pinterest board - in this case, private of course, so she would have no hints that a quilt was coming.  I have loved Shakespeare in the Park for a long time.  It is on my bucket list.  I also love Storm at Sea.  I remembered some other patterns that look like curved piecing, but it is actually an optical illusion - looked curved (which I am scared of) but is not.  I looked at patterns called Calypso, kaleidoscope and others.  I found 3 patterns that are very similar I was drawn to for this project - one called Emily's wedding quilt,  another called  Aunt Gracie's Garden Quilt, and finally Missouri Star Quilt Company has a tutorial on it.  It is actually 2 blocks put together that look totally different when placed together.  I did not like the edges having incomplete blocks, so I found a pattern just like I wanted called Sweet Dreams in a book of red and white quilt patterns by Martingale Press.  Sweet Dreams, perfect name for my daughter in law's new quilt!

     Emily's Wedding Quilt
     Aunt Gracie's Garden Quilt
     Missouri Star Quilt Company Version
     Sweet Dreams by Lissa Alexander  


     So pattern decided upon!  Then on to fabric choice.
    Several weeks ago, knowing it could come in handy in the future, I had sent a link to Shannon Brinkley's color style quiz to my daughter and DIL.  I wanted to see what color schemes they are most drawn to.  How helpful is that to know!   You can take the quiz here:    Shannon Brinkley's Color Style Quiz
     Both girls came up as "spring" while I fell evenly between spring and winter which are basically the same, just winter is more intense.  White, not cream.  Clear colors, not muted.     Then I saw that Missouri Star Quilt Company's Daily Deal was a layer cake (10 inch squares) that were spring colors and perfect for DIL's quilt!   It was from Riley Blake Designs, called Hand Picked by Tammie Green.  Two layer cakes would be needed for this project.


     I spent the weekend starching and ironing fabric.  Intricate piecing is always easier to manage and more precise with highly starched fabrics.  I use straight liquid starch, not to be confused with spray starch.  I do pour it into a bottle and spray it on.  When dry, the fabric  becomes stiff like card stock.  
     Ready to begin!
   

Thursday, January 17, 2019

Baby Arizona

   
  I was recently commissioned to make a baby quilt for a special baby whose name is going to be Arizona.  Her parents lived in Casa Grande, Arizona and had recently moved to Wisconsin.
     It seems the hardest part for me is deciding on a design.  Cacti are big right now, but are they right for a baby quilt?  I was told to make it whimsical.  I spent a lot of time looking at fabrics.  I texted pictures of feminine looking cacti fabrics to the customer for her opinion.  We selected a backing fabric that was light pink with cacti in aquas and pinks and grays.

     Who wants to lay their baby on top of cacti?   I remembered being in the Arizona desert and early one morning seeing a hot air balloon flying over the cacti.  This might be an idea I can go with.  So here is my original sketch that I shared with my customer.  She liked it.

My original sketch of an idea.


     Now to make it a reality.  I went to another fabric store with my backing fabric.  The backing fabric actually caused a problem for me.  The greens were more of an blue green.  Most regular greens I looked at for the cacti clashed with the colors in the backing fabric.  I eventually decided on a triangular print that I thought blended well and would give texture to the cacti.  Then mountain fabrics and sky fabrics were selected.  Desert browns and tans did not go with the backing fabric either.  Since gray is the new neutral, I found grays that would work well as desert floor and mountain - I look for fabrics that will give a shadow and texture effect.  
     Remembering the "rule of thirds"  I began to lay out the proportions for the quilt.
     I stitched the floor of the desert to the sky as a beginning point.  I wanted to match the shape of Picacho Peak for the mountain.  I had visited this area and knew the parents to be had climbed this peak several times.   If I did it just right, they should recognize it.
     I tried freehanding it and could not make it look just right.  Finally, I downloaded the picture to a word document, kept zooming in until the peak section filled the page and printed it.  Then I could trace it onto the fabric.
     The response from the customer when she finally saw the quilt was, "You nailed Picacho Peak."  Just the response I hoped for!
     I used Misty Fuse for the applique.  Shannon Brinkley is the one who turned me on to Misty Fuse.  It leaves the fabric with a natural, not stiffer feel.  I keep all my scraps with Misty Fused backing in a separate container to use on other applique projects.  I also learned from Shannon to use a stabilizer behind the applique when I zigzag the raw edges.  It prevents "tunneling" which if you have ever seen it will know exactly what I mean.  I used a tear away stabilizer behind the edges.
     On to the foreground.  Using some of the backing fabric, I ironed a lightweight interfacing and cut out some of the cacti.  I then raw edge stitched them to the foreground.  Googling suguaro silouettes  I printed outlines changing the sizes.  Using a technique I learned from Bee in My Bonnet's Lori Holt, I stitched around the outline of the suguaro to the same lightweight interfacing bumpy side to right side.  Then I cut a slash in the interfacing, turned it, evened out the edges and pressed it onto the foreground.  I used an applique stitch to attach that gives a hand turned look.
     I decided on 3 balloons in different sizes to give them a look of differing distances.  Each would have one of the baby's names, first, middle and last.  I cut out wrapping paper in order to try out the sizes and placement I wanted.
Wrapping paper to decided on sizes and placement of the hot air balloons.


     Now to the fun part.  Decorating the balloons.  Going through my bin of Misty Fused fabrics I selected fun and bright colors to make each balloon special.  While I had problems choosing fabrics to blend with my backing fabric for the desert, cacti and mountains, I had no compulsions about making the balloons coordinate as balloons flying over the desert are multicolored and beautiful.  To add more whimsy, color and fun, I added pennant banners flying from each balloon.

     When it came time to quilt the quilt, I added desert animal outlines in quilting which represent camouflaged animals.  There are snakes, lizards, foxes, horses, tortoises and other animals.  The sky was quilted with whimsical curls to add to the fun.
     The binding was a fun black and white polka dot.  
     The customer was quite pleased with how it turned and the new parents were excited and happy with the quilt honoring their new baby.
      
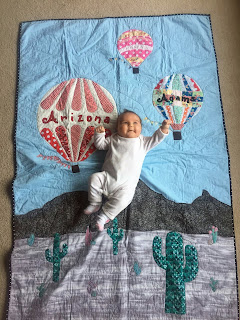
Baby Arizona enjoying her quilt.


Saturday, January 5, 2019

2019 Reading Challenge

Welcome 2019!
The beginning of a new year is always a great time to take stock of your life and what is going on, what you want to accomplish, how you want to change.  I don't necessarily do resolutions, but I will set goals.

One goal I like to keep track of is reading.  I always have a book I am reading, but often fail to keep the list of what I have read.

This year I am challenging my family to use Tim Challies Reading Challenge.  

I like Tim's list because it keeps me from reading the same type of books over and over again.  His is a list for Christians, but there are plenty of categories that do not fall into a Christian category.

I have finished already a book recommended by a friend, Kristin Hannah's The Great Alone.
Next I have started a book I picked up at a thrift store over a year ago, a biography by Dan Kurzman, Ben-Gurion, Prophet of Fire.  I have always been interested in the history of modern Israel.  This is a physical book.  I normally read a digital book and love audio books while sewing or walking.  I found this article interesting in promoting physical books. 

So begins my year long reading goals.  Of course, I also have sewing goals, fitness goals, relational goals.

What are your goals for the new year?